home server
A home server probably involves too much overhead work for the average consumer, but for me it's been an excellent learning experience in the practicalities of Linux administration on a small scale. As my skills, needs, and interests have evolved, so too has my basement server.
a brief history
My first home server was also the first computer I ever personally owned: my high school was dumping old PCs, and the IT guy asked if I wanted to loot any of it. I eventually cobbled together a Pentium III box with a pile of miscellaneous hardware, which evolved as bits died or were added over the next few years. This was also the box that introduced me to Linux, and I learned a lot through repeatedly messing up my Debian installation. I did some light web hosting and ran a MUD for my friends. Eventually this machine became hilariously outdated, and I found a cheap Dell Poweredge 1850 (a dual-socket 1U server) which I beefed up with what felt like a monstrous 5 or 6GB of RAM, hot swap 15k RPM SCSI disks, and faster (Pentium 4 era) Xeons. I used it as a Minecraft server, a shell server for IRC, and more serious LAN media serving. Slowly I realised why nobody uses 1U rackmount servers at home (hot, loud, and power-hungry), so when I saw the low-power ARM-based Seagate Dockstar being liquidated for $20 (long before the Raspberry Pi), I grabbed one immediately, and it served well for several years.
fixing what ain't broke
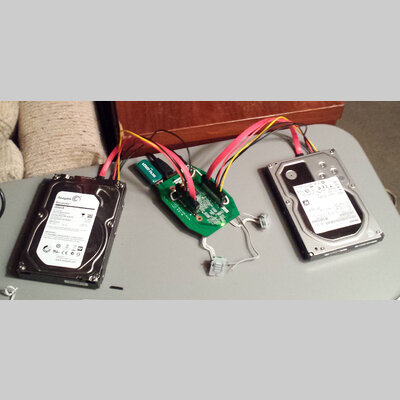
While the Dockstar provided everything I needed, it felt somewhat... inelegant, underpowered, and old. Or perhaps I was just bored and ready to play with my setup. In any case, there are very few ultra-low-cost Linux-capable ARM devices with two SATA ports (i.e. enough for a primary drive and a backup), along with gigabit ethernet. I chose the SeaGate GoFlexNet; not only is it essentially a Dockstar with SATA ports, it also has... ten userspace-accessible LEDs! So fancy.
To serve (har har) my purposes, a few modifications were needed:
- Installing a modified bootloader to support booting from USB (and installing Debian with a suitable kernel to a flash drive, which was surprisingly complicated).
- Soldering a 12V rail to the SATA header (they were meant for 2.5" drives, the 12V pins were left unconnected).
- Swapping in beefier power supply for the hungrier 3.5" drives I want to use (I went for a 12V/6A supply, as I couldn't find a way to do staggered spinup for reduced peak draw during boot).
- Sticking small heatsinks onto the CPU and network chip (I've very rarely experienced some instability under heavy load with my Dockstar, and the chips get very toasty).
Right now the device is naked, as 3.5" drives on top would make it dangerously unbalanced. Also, the SATA headers are awkwardly positioned, so I've acquired short extension cables to mount the drives more naturally. I'm in the process of planning a simple case, which may include a fan and a small display for serial output during boot.
notes
- Boot from a partition label, it's more flexible and results in less trouble.
- Having a USB 3.3V serial connection is either critically important or absolutely indispensable, get one before messing with devices like this.
- I don't use a swap partition on my root flash drive, and instead have a swapfile on one of the SATA disks.
