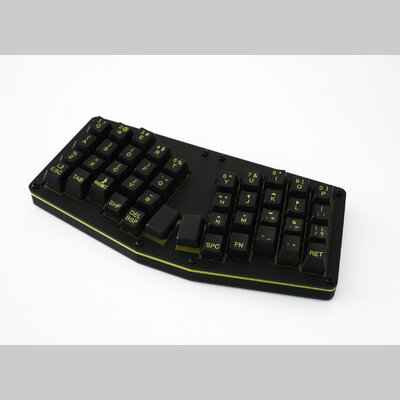
atreus keyboard revisited
My previous Atreus keyboard was usable, but had some flaws. Firstly, the hand-wired matrix (for those unfamiliar, this means free-form wiring without a PCB) had sporadic issues, and also bothered my sense of order. The bluetooth system was spliced on, making the complete system pretty chunky, and the firmware had no knowledge of it, limiting power-saving opportunity. I still love the layout overall, so I've revisited the project with some improvements. For a full discussion of the motivations and challenges, see my blog post about it.
A brief summary of changes:
- real PCB
- wireless inductive charging via a Qi coil
- Bluetooth low energy
- giant battery
- reduced height
- Cherry silent MX brown switches
- powersaving states based on time since last usage
controller and firmware
I'm using an Adafruit Feather 32u4 Bluefruit LE, since it integrates battery charging, bluetooth, and a QMK-compatible MCU. Unfortunately, due to a mixture of factors, my board can't seem to run QMK, so this choice was a bit of a wash. It's not a cheap board, either.
I wrote my own little firmware; it only provides basic functionality (i.e. just normal typing on two layers). The main technique used for saving power is reducing the matrix scanning frequency based on time since last keypress. After some number of seconds, the MCU spends more than 99% of its time in a low power state, dropping the power usage from milliamps to microamps. It's also careful to turn off the LEDs (four LEDs on the Feather! Why!) whenever possible.
power
On the topic of power, I stuck in a huge battery (2000 mAH). Due to the shape of the Atreus, there's tons of space under each side to add a (low height) battery, so I went for the largest one that would fit. On the other half of the keyboard, I've added a Qi charging coil. It gets pretty warm while operating, but does work, and the convenience is quite satisfying.
other notes
Now that I have a 3D printer with a larger print volume, I've replaced the middle layers of the board with a single 3D printed piece. This improves rigidity and ease of assembly by a huge margin; carefully layering all the quarter pieces every time I needed to open it up was becoming infuriating. I like the combination of 3D printing structural components while laser cutting cosmetic ones (in this case, the top and bottom panels).
Most other aspects of the keyboard are carried over. I still love the layout, and hadn't realized how much I missed typing on it. I'm using the same custom printed/sculpted keycaps. The faceplate, switch plate, and bottom plate are the same. I chose slightly different switches (Cherry's new silent MX brown vs. the standard MX brown).
Since I have a few PCBs and case parts remaining, I plan to build another one or two, just for fun.
I'm not really happy with any of the code or physical designs I've made for this version of my Atreus, but I'm going to throw them on Github with caveats anyway. Maybe I can convince someone to debug QMK for me...
